Showing posts with label DIY. Show all posts

Saturday, April 8, 2017

Kid's Art Throw Pillows


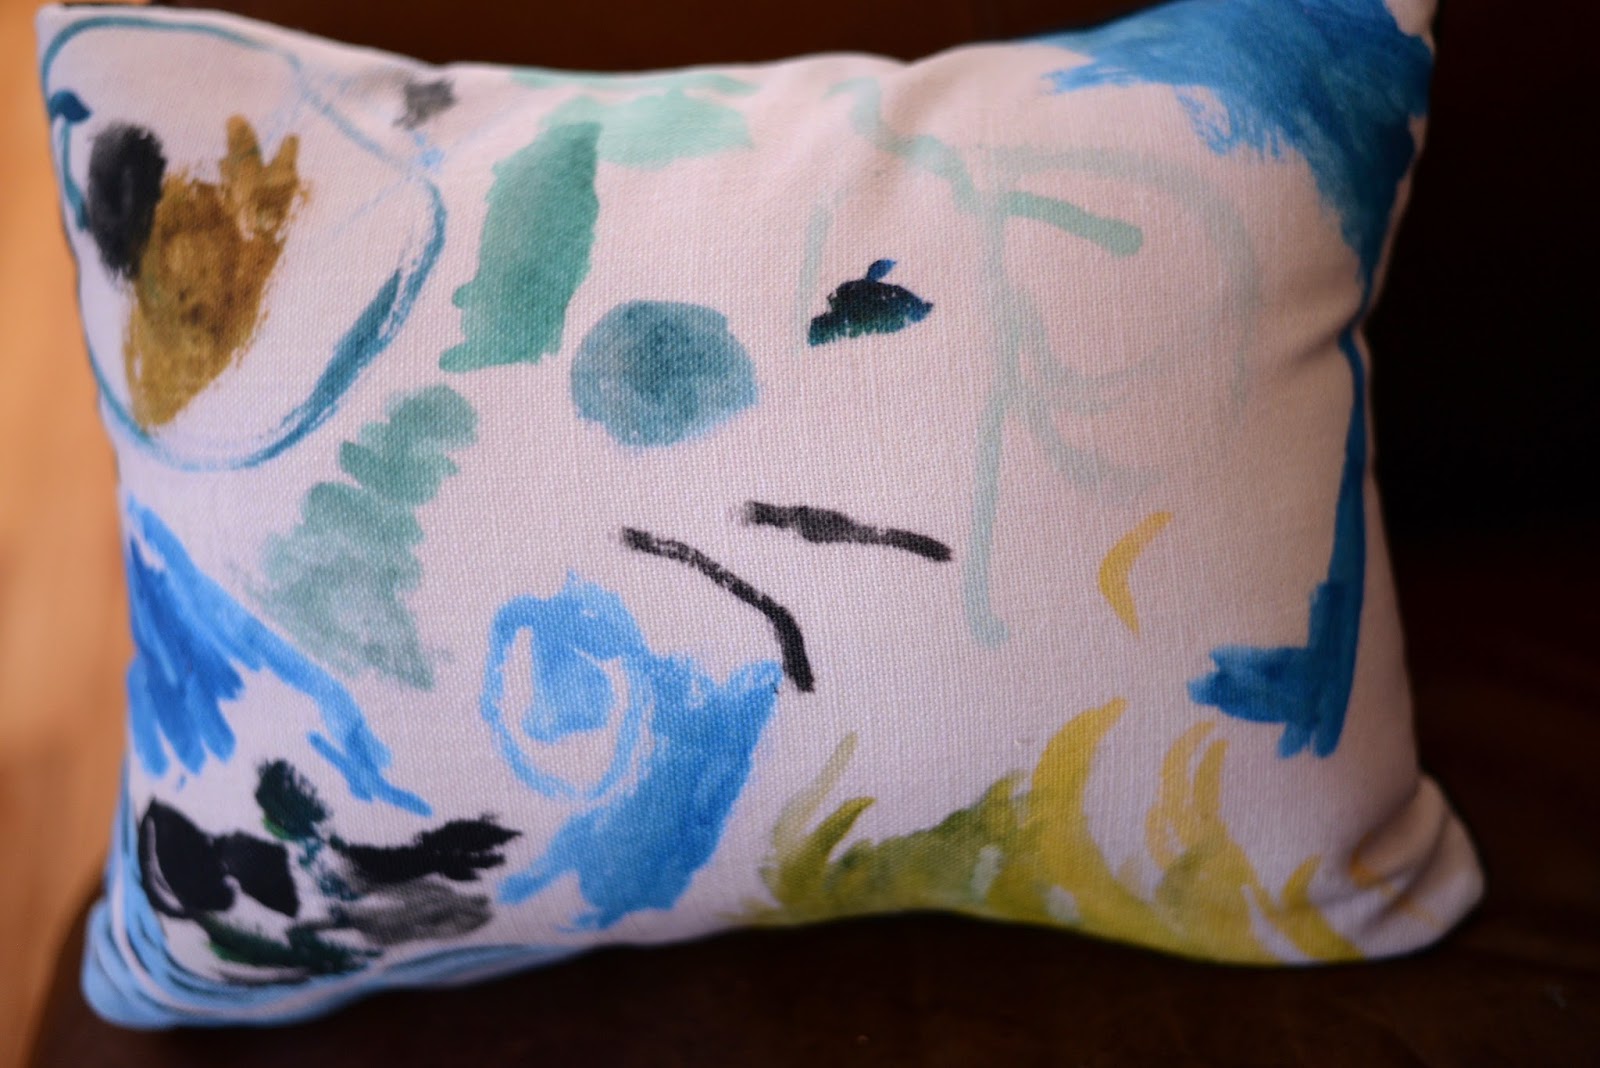
So when I am trying to distract myself from my frustration over our house being rebuilt I try to focus on the fun stuff I get to buy with our replacement money from the insurance company. I recently ordered my dream sofa from Room and Board and was searching for the perfect throw pillows to go with it. I was thinking something abstracts, colorful and with a watercolor feel. Then I had the idea to get some of the kid's paintings printed on pillows!


What a great way to incorporate their artwork in to our living space. I photographed the paintings and uploaded them to Shutterfly. then ordered pillows printed with the photographed artwork. It was so easy and they turned out so beautifully! The blue and gold pillow is Clover's painting and the purple and green one is Echo's


I can't wait to see them in place on my beautiful new sofa. It still feels like a long way off before we are back in our house but siding is going up today so that's progress at least!

Thursday, December 8, 2016

Story Stones


While I'm working on getting my November pictures up here is a quick little post about my latest DIY project. Every year I try to make one thing as a homemade Christmas Present for the kids. I'd love to do more than one but to save my sanity I have to limit myself :-) Last year it was felt crowns.

This year I decided on story stones! Echo is a big story teller and I think these will be really fun as prompts during our story telling play. Clover will probably get a kick out of just playing with them so I made a set for each girl. They were really fun and easy to make. I used acrylic enamel paint and some river stones I ordered on Amazon.

It was fun coming up with ideas for the story stones and taking my time painting each one. Hopefully this will be something my kids can treasure for years to come.

Tuesday, March 8, 2016

Valentine's Gifts


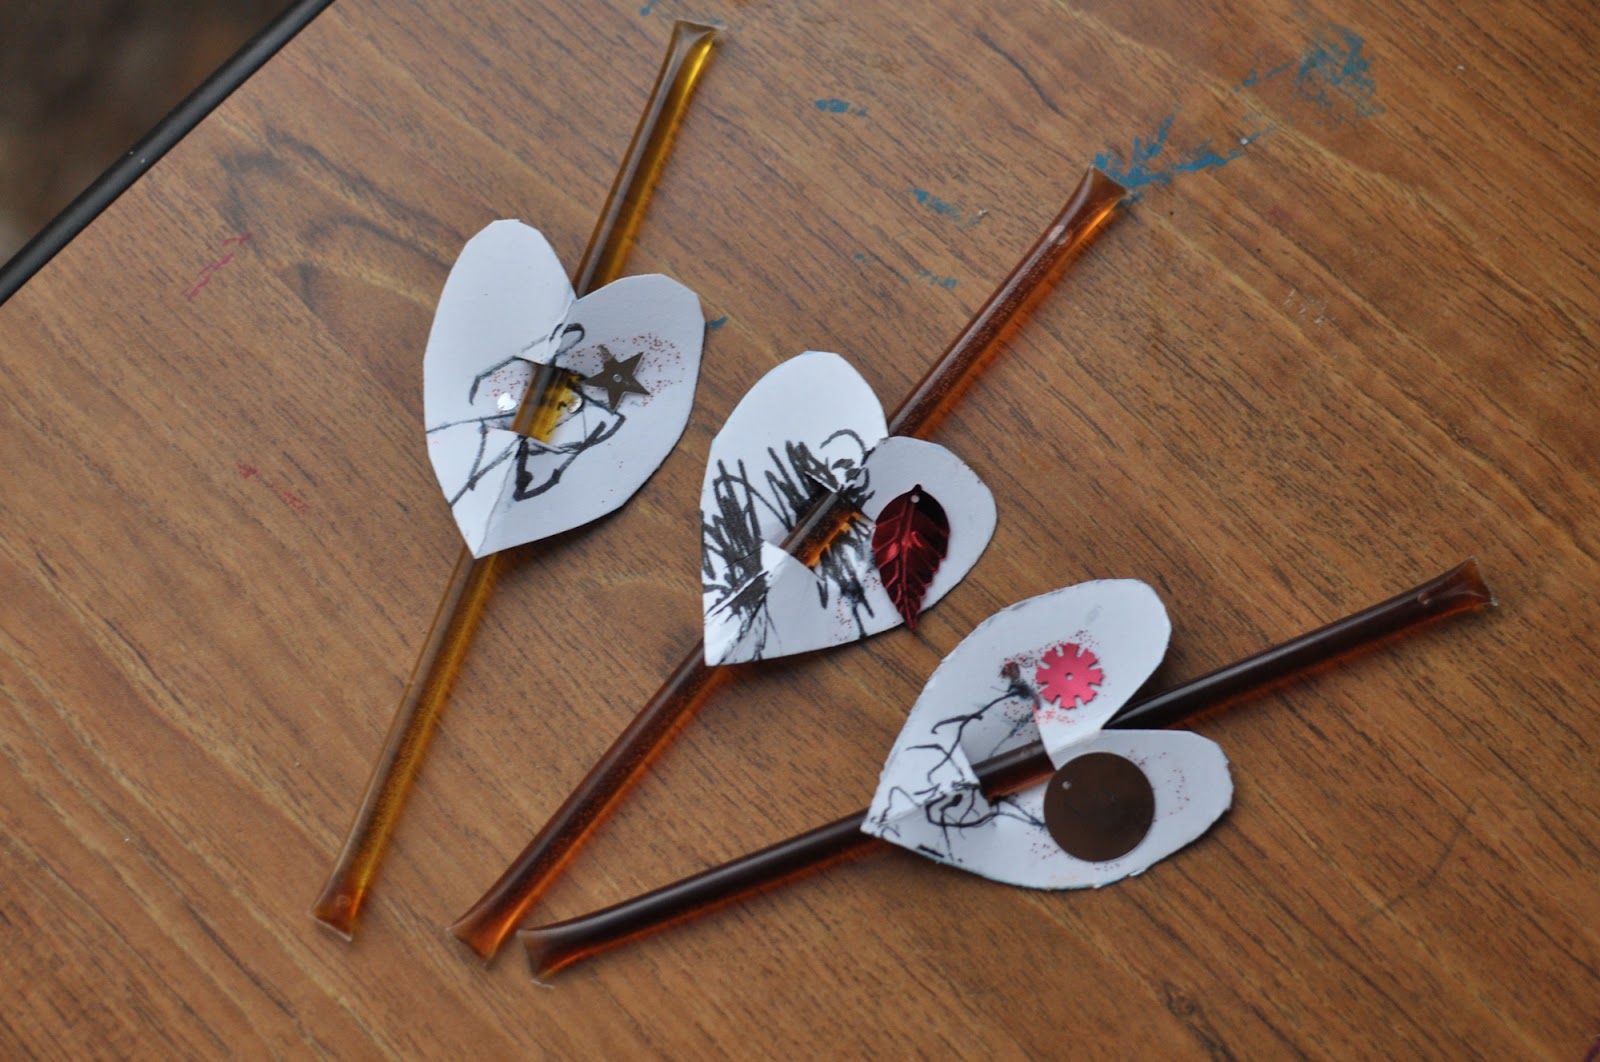
We have had so many huge things in the works that I am way behind on posting but wanted to quickly share the valentine's gifts Echo gave to her friends at our preschool coop. A lot of kids in our group have dietary restrictions including a lot of gluten free folks as well as some vegetarians and some that don't eat sugar. Echo and I came up with the idea of giving honey sticks for Valentine's day since it is a sweet treat that met everyone's needs. I cut out the heart shape and then had Echo decorate them. They turned out really cute and they were a big hit with everyone! Definitely a solid choice for a relatively healthy Valentine's day treat.

Friday, February 12, 2016

Homemade Playdough


I can't believe that it has taken me this long after having kids to make my own play dough! I think it's like a requirement for crafty stay at home moms ;-)

The cold winter months are perfect for this kind of activity and now that Echo is old enough to help cook things on the stove it seemed like the right time.


I got our recipe from the Artful Parent (awesome book that we use almost daily and a great blog as well). Here is the recipe (copied from the Artful Parent blog and pasted here for your convenience).


MATERIALS

5 cups water

2 1/2 cups salt

2 Tablespoons cream of tartar

8 Tablespoons vegetable oil

Food coloring or liquid watercolors

5 cups flour

Glitter and/or essential oils (optional)

INSTRUCTIONS
1. Mix the water, salt, cream of tartar, and food coloring in a large pot.
2. Cook the mixture on medium-low heat, stirring regularly until it is hot.
3. Add the oil and mix.
4. Stir in the flour, 1 cup at a time, mixing between each addition with a wooden or other strong spoon.
5. Continue to mix until the playdough pulls away from the pan and is no longer sticky. Pinch it between your fingers to test it (but be careful because it’s hot!).
6. Place the dough on the counter, let it cool a bit, and then knead.
Note :: This is the time to add glitter or essential oils, if desired. Simply place the additions in a well in the center of the playdough, then knead the dough thoroughly to mix.
7. Store the dough in an airtight bag or other container at room temperature. It will keep for months.

I added glitter, blue liquid watercolors and peppermint essential oils just to make it really fancy. The kids really loved making and using the play dough and it made a huge batch! I especially enjoy how good it smells with the essential oils, it's very relaxing to mush in your hands :-)

I have been storing it in a large ziplock bad in a drawer with our other play dough it so far it's holding up really well. We are going on three weeks now and it's good as new.

Tuesday, January 26, 2016

DIY Felt Crowns


I'm very late in sharing these but I made some really easy home made felt crowns for the girls this Christmas and they actually turned out pretty impressive looking so I thought I would post them here. I always aim to make at least one home made present for the kids and this year I went with the crowns because it was super simple.


I cut two sheets of felt in half in different colors that I thought would compliment each other and cut the tops in a zig zag line. After that I hand sewed some cute little felt flowers on the front piece and then machine sewed the two pieces together with a band of elastic at the back.


Clover doesn't care for hers but Echo actually loves them both and wears them regularly. It's such a nice feeling to have her enjoy something that I made so much and I also get to feel proud that they look great and were super inexpensive to make :-D

Tuesday, September 8, 2015

Arm Knit Infinity Scarf


Knitting is something I've always wanted to get in to but every time I try to learn it ends in frustration. I have a really hard time having the patience to finish a project. That's why the idea of arm knitting appealed so much to me. From everything I had read it is knitting for people who don't have the patience for regular knitting. Since you use a big chunky yarn and use your arms like giant knitting needles the project works up really quickly so you can make a scarf in about 30 minutes. Perfect for me! Plus I love the look of those chunky yarns.

So when I saw this beautiful thick white yarn on sale at Michaels for $1.50 I figured it was a sign that I should give it a go. There are a ton of tutorials out there for arm knitting and I tried a bunch of them but since knitting doesn't seem to come easily to me I needed something really simple. After trying and failing with a few other tutorials I finally was able to follow this one. Once I got going it was really easy and fun!

If you are knitting challenged like me I suggest you try it! I am also learning to crochet from a friend so maybe I can post about that soon. Now I just have to wait for it to be cold enough to wear my new knitted creation.

Monday, July 6, 2015

Upper Kitchen Cabinets


I finished redoing our upper kitchen cabinets just before having surgery last month. Our kitchen renovation is still slowly, slowly coming together! I was excited about this because it's the first home improvement project I have been able to participate in in a while and I did it almost completely on my own! It really made the kitchen much brighter, there's nothing like a fresh coat of paint to spruce things up. It's really hard to get good pictures in the kitchen because the light is so low in there but this will at least give you an idea.


So the only things left to do in the kitchen now are the backsplash, edging on the flooring and touching up the paint on the bottom cabinets. I'm starting to think we might actually get this done one day!

Thursday, May 21, 2015

Zipper Pouch


What with everything we've had going on I haven't sewn a thing all year. Seriously, I made it to May before sewing a single thing! So sad, I really want to get back in the sewing game. Anyway, I took advantage of Mother's day as a chance to sew something simple and pretty so I made this little zipper pouch as a the wrapping for the necklace I bought my mom. I figured it's nice to get a little something you can use again with your main present inside.

I followed a lovely little tutorial on This Heart of Mine and it made it really easy, especially since I had never put in a zipper before! I got a chance to use one of the zippers my sister in law gave me for Christmas and also got to use some fabric scraps I had on hand ( zipper pouches are a great way to use scraps!). It was so easy to make I want to make a whole bunch more to help me organize my life :-) It's hard finding time to sew with my two very active little ones but hopefully I will get to make more of these soon!

Wednesday, May 20, 2015

Preserved Lemons


I have a little break from doctor visits this month since I've finished my chemo and still have about a month until my surgery. This means I am feeling better and have a little bit of time to work on experimental kitchen projects. Preserved lemons are a big deal in Middle Eastern and Moroccan cuisine. I've always wanted to try making them but the last time I started a batch they totally failed because I used a container that wasn't totally air tight, oops...

This time around I have my act together a bit more and I'm hoping these will turn out to be delicious! They are still fermenting right now so I haven't actually gotten to try them yet but they sure look pretty and they couldn't be easier to make. First you have to sanitize the lemons and jars with boiling water. Next cut each lemon as if you are cutting them in to quarters but stop at the last second so they still stay attached. After that you pack each lemon with kosher salt and stuff them in the jar. Use a wooden spoon to much them around a bit and get the juices of the lemons flowing. If you have any extra lemons you can squeeze some extra juice on top too, the idea is to have the lemons completely covered in brine. Then all you have to do is wait 3 to 4 weeks and after that pop them in the fridge. When you are ready to use them just rinse them off and chop them up to add to salads, chicken or fish dishes. I'm really eager to try them out, I love Middle Eastern food so I have high hopes. I will try to post a recipe using them when the finish, yum!

Sunday, April 26, 2015

Our Home Made Pantry


The list of things we make completely from scratch and pretty much never buy from the store is getting longer and longer. I'm pretty proud of this as it has been one of my goals to gradually increase the pantry staples that we make at home. Making your own has several advantages including that it is usually more economical and tastes better. It also gives you the chance to control exactly what goes in to your food. For example we don't like sugar in our pasta sauce and store bought varieties without sugar can be pricey. The downside of making all these basics from scratch is that then I feel pressured to never buy them again and always make them from scratch. Sometimes I have to be reminded to give myself a break!

For the most part however I really enjoy being able to make a lot of our condiments and other pantry staples. The things I currently make from scratch instead of buying include pasta sauce, bread, apple sauce, yogurt, hummus, granola and most recently salad dressings and ketchup. Well we are now adding one more thing to the list and that is homemade vanilla extract! (See photo above).

I know we might be a little late getting in on the home made extract thing but I was originally concerned that it would be more expensive than store bought since vanilla beans are so pricey. But after finding a good deal on bulk vanilla beans on Amazon we decided to give it a go. Our first batch was made with vodka which is what most tutorials will tell you to use and it turned out splendidly! We were so excited by the superior flavor (and the large amount of extract we were able to produce) that we decided to try two more batches, one with rum and one with bourbon.

Making your own vanilla extract couldn't be easier, you just split the vanilla beans and submerge them in your alcohol of choice. Then just let them sit for a few weeks, giving them the occasional shake, and strain before using. I think we left our vanilla beans sitting in the vodka for about 3 or 4 weeks but I'm sure you can leave them much longer if you like.

Once you get going on this kind of thing and see how easy it is it's really pretty addicting. You get to feel really proud of yourself and it's really not that much work when you come down to it. I'll definitely be looking for even more items we can make at home in the future!

Monday, December 15, 2014

Hand Made Christmas Decorations


Christmas is my favorite holiday of all time. Hooray! It's almost here! Here is our lovely tree, put up on a table to give us more room for presents underneath ;-)

Celebrating Christmas with Echo this year has been so much fun, she is finally old enough to start to get what it's all about. We have been reading Christmas books for months, been to two tree lightings and yesterday we took her to see live reindeer at the nature center.

One tradition that I wanted to start with her this year was making ornaments for the tree. She still doesn't really have the attention span to stick with it very long but she enjoys the idea of it and I'm hoping that next year she can take a more active role.


We did the traditional popcorn garland of course...


And one that was new for me this year, dried citrus slices. This one is so easy and so pretty, plus it made my house smell great! Cut your citrus thin (we used grapefruit and orange slices) and pat with a towel to remove excess moisture. Bake on your ovens lowest setting for 4 hours or until the citrus is completely dry, not sticky. I poked some holes in them with a bamboo skewer and threaded pretty ribbon through and Echo helped me hang them on the tree.


Last but not least, a pretty paper garland made from my mom's scrap booking paper. Echo had zero interest in this one but maybe next year :-)


What are you doing to decorate for the holidays this year? Any good kid friendly ideas?

Thursday, November 20, 2014

Eric's New Laptop Bag


I have really gotten in to making bags over the past year and I finally had the guts to make one without a pattern. Eric got a new Macbook Air for his work and needed a lightweight bag to carry it to and from the office. He gave a me a list of requirements for the bag, it had to be well padded for protection, it needed a long long strap to fit his tall frame, it needed a pocket for the charger, pens, notebooks and what have you, and it needed to be compact and lightweight so it's easy to haul around. I looked for a tutorial for something like this online but couldn't find anything I was happy with so I just came up with this on my own.

I found some beautiful green wool felt at the fabric store and got some cotton plaid to compliment it for the pockets and lining. I basically made two rectangular bags and attached the shorter of the two to the outside for the pockets. I also sewed in some quilt batting to the outside bag for extra padding and with all the layers of thick fabric the laptop is pretty cozy in there. I was a little intimidated because I was using some hardware that I hadn't worked with before but I was able to look at pictures of bags online to figure out how to put it all together and the brown cotton webbing I picked up for the strap is sturdy and attractive. All in all not bad for my first laptop cases and first bag with no pattern :-)

Thursday, November 6, 2014

DIY Reusable Food wrap


I promise I will be getting our October photos up soon but first, DIY reusable food wrap! With the weather getting colder I have been feeling more and more like crafting and baking and this is a project I have been wanting to try for a long time. I'm sorry for the horrific picture, it was taken in the early morning hours when it was still dark outside since that's the only time I get to myself these days ;-)

This idea is simple but so cool. You just cut a square (or rectangle, whatever shape you need) or fabric and grate some beeswax on top with a cheese grater. Try to get the wax shavings evenly spread out and not too thick. I started slow and added more wax as I needed it because you don't want to over wax your fabric. Then all you need to do is put your fabric on a foil lined cookie sheet and pop it in a warm oven. I just stuck it in while I was preheating my oven for some bread baking. It won't take long to melt but you need to check it to make sure the fabric is saturated with wax. If you need to spread some wax around, use a stiff paint brush to help get the spots you missed. Let the wrap cool and then you can wrap it around anything you want to help keep it fresh. I have been using mine for bread and it works great!

I plan to make more in the future and hopefully help reduce our need for plastic wrap down the road, this is prettier, cheaper, more environmentally friendly and smells like beeswax so it's an all around win!

Tuesday, November 4, 2014

DIY Mei Tai Baby Carrier


One this I never used much when I had my first baby was a baby carrier. I loved the idea of baby wearing but I never found a carrier that was comfortable and it seemed easier just to carry her in my arms. I didn't want to shell out a bunch of money trying to find the right carrier (this things can be pricey!) so I just gave up on the idea. With baby number two I decided to give it another go however. I figured I would need my hands free to do things with Echo so I might use a carrier more (boy was I right!). I started off with a soft stretch structured carrier that I really liked, it was comfortable and easy to put on. The only problem was that as Clover started to near 13 or 14 pounds it started to sag and it just wasn't working for us any more.

Being the crafty (and cheap) girl that I am I decided to try to make my own carrier. I have had several friends that had Mei Tai style carriers and really liked them. They seemed simple to put on and the design was easy to make so I whipped out some extra fabric I had leftover from our wedding (I've gotten so much use out of this stuff!) and found an online tutorial to follow. There are a ton of tutorials for homemade Mei Tais out there but the one I used can be found here. The instructions are really clear and easy and it took me no time to put it together.

Honestly it has been a godsend, I can wear Clover when she starts to get fussy and it will put her to sleep so i can cook dinner. It's amazing for grocery shopping because I can wear her and still have two hands to push the cart, plus it leaves the seat on the cart open for Echo! It's kind of crazy how expensive theses carriers can be when they are so simple to make! Just be sure that if you make your own you reinforce your straps and use a nice sturdy fabric, safety first!

Clover seems to really like this carrier and it's really comfortable because of how evenly it distributes the weight across your back. Winter is the perfect time to wear your baby too, they are so snuggly and warm! My advice would be to not be intimidated by baby wearing and to give it a shot. It's not right for every mom (or every baby) but if your baby likes it it can really save your sanity and help you get stuff done! Also, if you are at all crafty think about making your own carrier, I was amazed at how simple it can be!

Thursday, October 2, 2014

Upcycled Diaper Clutch


I stopped carrying a diaper bag and started just carrying a large regular purse this year. My old diaper bag was falling apart and diaper bags are crazy expensive. I love my large purse but the problem is it doesn't have a ton of pockets to store things so it ends up being a hot mess of disorganization. To help with that problem I whipped up this little envelope pouch to store diapers in.


It's made from an old shirt and pair of pants that my brother was getting rid of, I love being able to salvage material from something and giving ti a new life! It came out a little wonky because I was in a hurry and didn't use a pattern or really measure anything but it's still cute and serves it's purpose.


I was able to use some Pentel Fabric Fun Dye Sticks to add a little leaf design. This dye sticks were a present from Eric years ago and I never got around to using them until just now but I am already sold! They are so cool! They go on like oil pastel but then you can iron them to set the dye and the design becomes permanent and machine washable. I see myself using these in lots of projects to come.

Friday, August 1, 2014

Salsa Verde


It's my due date and no sign of baby Clover making an appearance any time soon so it's more blogging to keep me occupied! Of course this could all turn on a dime so I'm still holding out hope that she will be on her way shortly :-)

The biggest and best surprise of my garden this year was the tomatillo plants! I haven't ever had any luck growing tomatoes and after this year I probably won't try them again. Tomatillos on the other hand turned out to have a number of benefits. First of all they are crazy easy to grow, a must for a lazy gardener like me. Secondly they produce abundant fruit, so you actually end up with enough ready at one time to make something with them. They are also really beautiful plants, the fruits look like little paper lanterns and last but not least they taste great!

The only down side is that it can be hard to find tomatillo seeds in stores but this is an easy fix thanks to the internet. I ordered mine from and heirloom seed company on etsy and they turned out beautifully. Personally I am in love with tomatillo salsa so I used my last harvest to make this simple and delicious recipe.

Ingredients
1 lb fresh tomatillos
3 tbs diced onion
1 jalapeno, diced (I seeded and deveined mine to cut back on the spicy but if you want it hotter you could leave the seeds)
Juice of one lime
1 Tbs chopped cilantro
cumin and salt to taste

Peel and rinse your tomatillos (hint, peeling tomatillos is a great job for a toddler, Echo loved helping with this!) and place in a saucepan of boiling water. Simmer tomatillos until soft but not mushy, they turn a duller shade of green when they are cooked. Transfer to a bowl and combine with other ingredients. Blend with an emersion blender until smooth (or you could do this in a food processor). Enjoy! That's really all there is to it and it is so fresh and delicious tasting.

I bet this would be a great recipe for canning as well but I didn't have the energy this year. Next year I will definitely be growing tomatillos again and I may try to can a few jars then. If you are in to gardening I really recommend trying to grow these little guys, I was so pleasantly surprised by them and have been enjoying them all Summer :-)

Tuesday, July 29, 2014

Home Made Birthday Gift of the Year: The Perfect Picnic Blanket

Sorry for the bad picture, it is all rumpled from being rolled up in our closet

Still no baby so I am trying to squeeze in a few last blog posts I have been meaning to do. Unfortunately I have been feeling lousy and very very tired so I didn't take any decent pictures of this project but you'll have to take my word for it that it turned out great!

I try to do home made gifts as much as I can (and supplement with store bought, I love giving gifts!) so for Eric's Birthday this year I made him a gigantic picnic blanket! We did a ton of picnic dates in the early days of our relationship, when I was in grad school and he was out of work and money was tight to say the least. Now that we have a little one (and one on the way) going out to eat can be really difficult for different reasons. Picnics however are a great kid friendly activity, we can get in a date night and bring the little ones along too! I have been eyeing the awesome picnic blankets that have a waterproof side for a while and decided to make one of my own this Summer. You can find the tutorial I used here. I love this version because it is extremely large but still folds up small so you can store it in your car, plus it has pockets for storing your goodies!

Close up of the fabrics
It uses a lot of fabric so it can be expensive to make but I saved up some coupons I had for Joanne's and was able to spend a little less that way. It was very easy to make because it was all straight lines but a little tricky just because there was so much fabric to work with. Anyway, it turned out lovely and I can't wait to get some use out of it when the weather cools down, I see a lot of picnics in our future this Fall!

Friday, July 25, 2014

A Plethora of Peaches


Wow we are really getting close to having this baby! I have been so uncomfortable this week that I am just ready to get it over with and meet my little girl. Luckily I have lots of things to do to take my mind off the pregnancy. For example, I have had to find ways of using up the gigantic box of peaches I bought at the farmers market last weekend! We buy peaches from Pearson Farm all Summer long, they are seriously the best peaches ever! Peaches also happen to be one of my very favorite fruits so when our peach lady told me last week she could give me a deal on a big box of scratch and dent peaches I jumped at the chance. This gave me about 50 very ripe peaches that I had to find something to do with right away.

Well it just so happened that my Birthday was last week and I got a bunch of canning supplies and a canning cookbook so the time seemed right to try my first ever (unassisted) foray in to canning. I have a good friend who kindly showed me the basics of canning last winter so between her tutorial and the instructions in my book it wasn't too difficult however it was very hot! It's a shame so much canning needs to be done in the Summer, I think I'll wait until cooler weather and maybe do apple sauce next time :-) This time around I made canned peach slices in vanilla syrup. I haven't tried them yet but they have every appearance of being delicious and I was thrilled that I was successfully able to seal the jars and complete the water bath canning process with no incidents. We also froze some peaches for smoothies, left plenty whole for snaking, and used some for making peach simple syrup.

I won't go in to instructions for the whole canning process at this point (maybe some other time when I have more energy!) but I do encourage anyone who is interested to try it some time. It seems intimidating but it really isn't that bad once you learn the basics, I am definitely excited to try it again! The peach simple syrup was so, well.... simple, to make that I will tell you how to do that though! it's also a great way to use up your leftover peach peels.

To make the peach simple syrup you take all your left over peach peels and put them in a large sauce pan. Put in enough water to cover the peels and bring to a boil, remove from heat and let sit for 30 minutes. Strain peels and any solids by poring the mixture through a fine sieve or cheesecloth and measure the remaining liquid. Return the liquid to the pot and add as much sugar as you have liquid (this uses a LOT of sugar, I actually didn't have enough in the house so I had to short mine a little but it still turned out fine so if you want to reduce it a bit you could). Return mixture to a boil and stir until sugar dissolves. Store in an air tight jar or bottle in the fridge.

I have been mixing my simple syrup with club soda to make a sort of peach soda and it is delish! We've also used it in peach milk shakes and has worked quite well but I bet it would be really delicious in a cocktail. Maybe I'll have some left for after the baby is born and I can try it in an alcoholic beverage then :-)

Sunday, June 29, 2014

Sewing Yet Another Bag


I have been really so bad about posting on here. I'm at that point in my pregnancy where I am just really uncomfortable all the time and now I am even having  a hard time sleeping. Lack of sleep combined with hauling around and extra 15 lbs (plus just generally feeling bad) has made me pretty exhausted. Making a whole new person is a ton of work guys ;-) It's hard to believe I have 5 weeks to go until my due date. Strangers have started telling me there's no way I'll make it 5 more weeks, that's how huge and miserable I look, lol!

Besides pregnancy I have been busy with other things including buying a new car! But more about that later. Right now I just wanted to quick post to show off my latest sewing project. This time it's a new bag that I made custom for my mom. It was really fun to have her go with me and pick out the fabrics and I'm starting to learn that bags are some of my favorite things to sew. They are so fun and rewarding! I was very happy with how this one came out but it just made me want to sew even more bags, Eric thinks I should start a business. You can find the tutorial I used here, it's a great easy bag to make that looks awesome. It's on the smaller side so if you want a giant bag it's not for you but it was quick and easy to make and it feels very sturdy.


Tuesday, June 17, 2014

Banana Bread Granola


I apologize again for my lack of posting lately, this pregnancy is kind of kicking my butt and I have been really tired and just struggling to get basic things done around the house. I do miss my blog though and I was realizing the other day how I haven't done a recipe post in forever so I thought I'd share my latest obsession. Seriously you guys, this granola is so good! It's so good in fact that I have abandoned my trusty peanut butter and chocolate chip granola in favor of it. Whenever I have granola out at a restaurant I always think, "well it's not as good as that banana bread granola".

You can find the recipe here at Minimalist Baker. It is so easy to make incredibly delicious! I make mine with just pecans and no walnuts and I use maple syrup for my sweetener which I find gives it a great flavor and the smell that perfumes the house while cooking this stuff is just divine.


 Echo love this recipe too and enjoys eating it with fresh fruit. I like mine with fruit and home made yogurt plus a drizzle of honey. Try this recipe and you will never buy granola again!